I have been using a talking multimeter for years, almost every day, and I find it extremely convenient and useful. I am continually surprised that they are not in use everywhere. However, the Arduino part of my old design works with only a handful of multimeter models.
This new prototype uses the SCPI communication protocol, which is supported by many modern measurement and laboratory devices. However, one communication layer below, some of them rely on USB, some on RS-232, and others on RS-485, so any related project can hardly be universal.
I own an OWON XDM 1041, and this design was intended for it. Nevertheless, disregarding the communication bus issue, both hardware and software should also work with other similar SCPI multimeters.
The OWON XDM 1041 also has an RS-232 variant, and a USB one. Mine is USB, and I initially wanted to add a USB host shield for communication. However, I couldn’t find my way around the USB libraries, although I had some experience using the USB host shield with USB keypads. So I decided on a risky move: I opened the multimeter case and wired the RX and TX lines (before the CH340C) to a nice new 1/8″ jack on the back panel. (Together with GND, of course.) This gave me a standard UART that can be easily connected to an Arduino. (Although I had to use a 3.3V board – the OPEN-SMART ONE, a dual-voltage clone of the Uno.) I am deliberately not providing any more details of the intervention itself, because those who need them should not even attempt it. Opening the multimeter case voids the warranty. Think and measure twice, the risk is yours alone.
Alternatively, if the multimeter has an RS-232 port rather than USB, integration is fairly easy. A simple RS-232-to-TTL converter and a 5V Arduino will do the job without requiring any hardware modifications.


The current audio tracks are in Serbian. They were recorded on a PC, using the Audacity software. There are 54 of them and they are placed in the root folder of the memory card. Each one contains one isolated expression: “1”, “2”, “3”… “11”, “12”… “20”, “30”… “100”… “900”, “point”, “volts”, “amperes”, “milli”, “kilo” etc. The program reads the value from the multimeter (in scientific notation) and from these audio snippets it assembles the number to be voiced, in a grammatically correct way, and then appends appropriate measurement units, with prefixes, if needed. For example, it will voice the number in microvolts if the voltage is less than 1 mV; in millivolts if the voltage is between 1 mV and 999.99 mV; in volts if the voltage is 1 V or more. The voiced number is always rounded to two decimal places, regardless of the unit and the prefix.
It works well. Audio examples:
For any other language, all of the tracks would have to be re-recorded. It would be easy for English or Russian, because the compound numbers in these two languages are formed in the same way as in Serbian. So each track should just be replaced with its English or Russian counterpart, while the program would remain the same. For French or German, it would be a little more work, because the program itself would have to be modified.
The program will not compile with newer versions of the SdFat library. Version 2.05 will work.
Download verified libraries that compile together.
Download audio tracks recorded in Serbian. The file names are in English though.
Comments and names of variables in the program are also in English.
Download XDM1000_Digital_Multimeter_Programming_Manual.pdf
Earlier, I tried to use the DFPlayer Mini MP3 board in this application, but it consistently inserts short pauses between successively played tracks. The same goes for the JQ6500 module. These pauses are not a big deal if you are playing songs or similar longer pieces, but they are a problem if you are dealing with individual words that need to be combined into a number in word form. The VS1053B MP3 shield lacks an audio amplifier… In contrast, the TMRpcm library works without any issues, while all the hardware it needs fits on a (new) shield, making it easy to integrate.
The audio amplifier module in the photo above: I removed a resistor to lower the gain of the LM386 from 200 to 20, but it sports a Zobel network with strange R and C values (100R and 15pF !), and it will oscillate if the speaker wires are long and the volume is high enough. (It should be something like 10R and 47 nF.) In its defense, the low-pass filter at its input is not perfect, so the PWM switching frequency probably also leaks through. Anyway, at normal loudness the amplifier works fine, and the size fits perfectly.
An earlier experiment (when the main part of the program was written):
https://yu2zz.com/2024/08/31/instrument-koji-govori-protokol-scpi-proba-s-owon-xdm-1041-na-zicama/
The old talking multimeter project:
https://yu2zz.com/2020/06/17/instrument-koji-govori-talking-multimeter-v2-0/
The TMRpcm library has many interesting features and configuration options regarding the audio, the memory card etc. It can also make recordings.
https://yu2zz.com/2022/09/08/snimanje-i-reprodukcija-zvuka-s-arduinom-iliti-arduino-sound-recorder/
August 2026 Update:
I have designed a custom Uno shield for the SCPI talking multimeter. It works with the same program (SCPI_TM.ino) and can also be used for other applications involving audio playback and recording with the TMRpcm (or similar) library.


The idle current is 26 mA.


The PCBs were produced by PCBWay. They deliver excellent quality boards, quickly. Also, they consistently offer a wider range of advanced and customized options and services.

In version 1.1 the trimmer potentiometer model was changed, so it is now easy to replace R5 with a connector if a case-mounted potentiometer is used. Also, it is now possible to use a trimmer with a long adjustment shaft. Finally, “TRIGGER” has been changed to “PLAY SW.” (“play switch”).
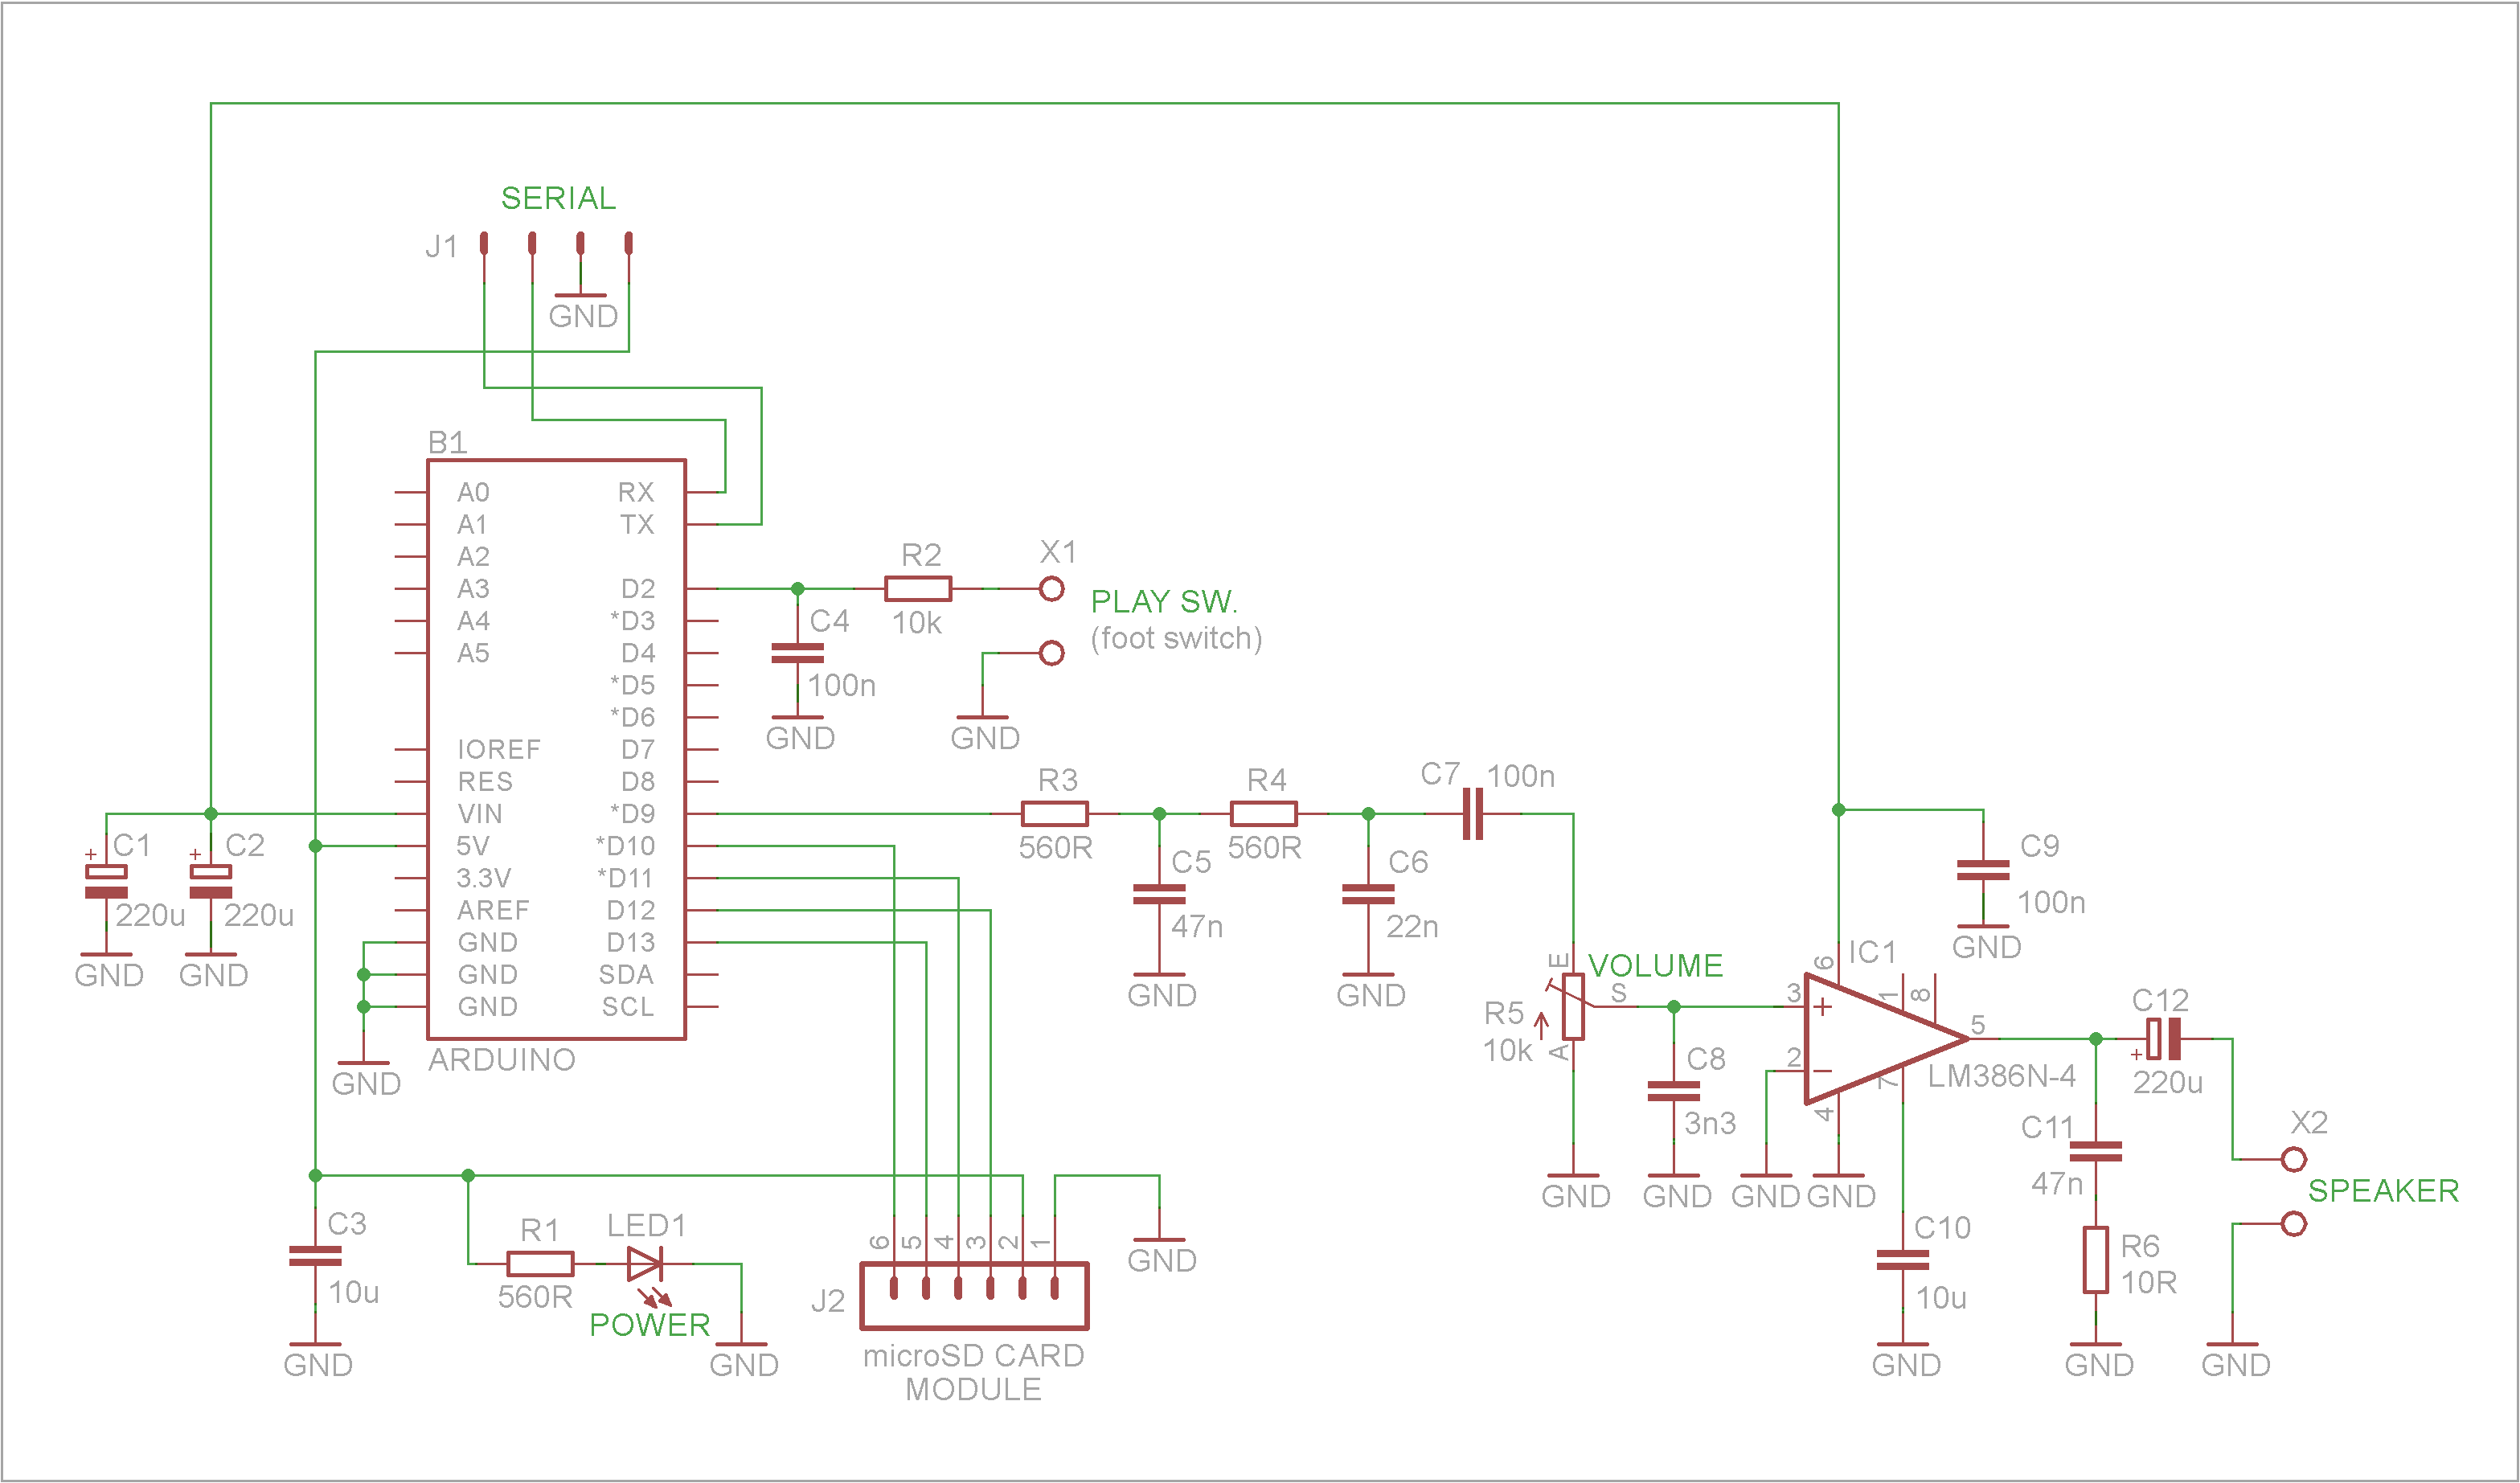
C3 and C10 are optional, but they make the circuit more robust.
The SMD resistors and capacitors are size 1206; they are large enough to solder even if you have no experience with SMD.
September 2026 Update:
(a possibility for further development)
After experimenting some more, I was able to communicate with my Owon multimeter through an Arduino USB Host Shield and the multimeter’s USB port. I downloaded ch340.zip from here:
https://forum.arduino.cc/t/arduino-usb-host-shield-2-0-ch340-driver-problem/620548
I then added cdcch340.h and cdcch340.cpp to the USB Host Shield library folder and voila – the attached example worked. I was able to send “MEAS1?” to the multimeter and to receive the response.
However, I will keep using the current version of the shield (the one that communicates with the UART directly), because it works without any issues.
Note: Not all SCPI multimeters use the CH340 chip, and different USB chips require different drivers (library files).
Warning: If you’re planning to develop a USB version of this SCPI speech add-on, keep in mind that the TMRpcm library won’t be able to use digital pin 9 on the Arduino Uno for audio output, because the USB Host Shield library reserves digital pin 9 for internal use. The USB Host Shield can be damaged if the Arduino sketch tries to use this pin as an output. Still, you should be able to force the TMRpcm library to use Timer2 (instead of Timer1) and output audio on pin 3 by uncommenting #define USE_TIMER2 in pcmConfig.h and setting audio.speakerPin to 3 in your Arduino sketch.


Pingback: ‘Instrument koji govori’, protokol SCPI, proba s Owon XDM-1041, na žicama… | YU2ZZ ····· Elektronika. Radio. Hobi.
Pingback: Talking Multimeter | YU2ZZ ····· Elektronika. Radio. Hobi.